Duck and Andouille Sausage Gumbo

Duck and Andouille Sausage Gumbo

Cooking Adventurous? If you are here is my delicious Gumbo recipe. My sister and brother-in-law were with us this week to celebrate Fat Tuesday and to stick with the theme I made Duck and Andouille Sausage Gumbo. They loved it and for my it was FUNDERFUL!

The recipe isn’t hard but it does take time. I was in heaven because of the steps it takes to make a dish like this. Anyone who loves to cook will understand. Yes, there are a lot of steps but it is well worth it in the end.

One of the great things about this recipe was that I could make it the day before and just slowly heat it up when it was time to serve. Making it the day before made it easy to relax with our guests instead of spending hours in the kitchen cooking and cleaning up at the last minute. Plus the advanced cooking gives the Gumbo time to develop the flavors.

Serves 6

1          5-Pound Duck, Back Bone and Wings Removed and Cut Into Quarters (If you have a butcher you can count on, ask if they will cut the duck into quarters)

4          Teaspoons Emeril’s Essence, Divided

¼         Cup Vegetable Oil

1          Cup All-Purpose Flour

2          Cups Spanish or Vidalia Onions, Medium Dice

1          Cup Celery, Medium Dice

1          Cup Carrots, Medium Dice

1½      Cups Red Bell Pepper, Medium Dice

6          Garlic Cloves, Finely Minced

2          Cups Yukon Gold Potatoes, Skin Left On, Medium Dice

7-8      Cups Homemade Ham Stock or Rich Dark Homemade Chicken Stock, Heated

12       Ounces Smoked Andouille Sausage, Skin Removed, Sliced Into ¼” Discs (or Smoked Kielbasa)

12       Ounces Tasso Ham or Smoked Ham, Cut into ½” Cubes

2          Teaspoons Coarse Sea Salt

1          Teaspoon Dried Thyme

2          Bay Leaves

Rice Pilaf As An Accompaniment

Preheat oven to 375°F.

Season the duck pieces with 2 teaspoons of Emeril’s Essence. Heat a large Dutch oven over medium high heat until hot. Add the duck pieces skin side down and brown until crispy, about 7 to 8 minutes. Turn the pieces over and repeat the process. Remove the pieces to a shallow roasting pan and transfer to the oven. Cook the duck for approximately 1 hour or until the duck is cooked through. When cooked remove from oven and let cool until the pieces can be handled to remove the meat from the skin and bones. Discard the skin and bones and set the meat aside.

While the duck is cooking reduce the heat to medium and add ¼ cup vegetable oil to the pan with the drippings from the duck. Immediately add the flour. Stir the flour with a whisk at first to incorporate the flour into the oil. Change to a large spoon and continue stirring the flour to make a roux. Cook the roux, constantly stirring and scraping up the brown bits from the bottom of the pan, for 15 minutes or until the flour turns a deep golden brown.

Add the onions, celery, carrots, red pepper, garlic, potatoes and sauté for about five minutes. Add the hot stock and stir to combine. Add the sausage, Tasso/ham, the two remaining teaspoons Emeril’s Essence, salt, thyme and bay leaves. Bring the gumbo to a boil, reduce heat to simmer and cook the gumbo for 45 minutes covered, keeping the cover slightly off kilter, stirring often to prevent sticking to the bottom of the pan.

Add the duck meat to the gumbo and cook an additional 15 minutes. Serve immediately with cooked white rice.

Place heaping ½ cups of cooked rice in the middle of individual warm soup bowls and ladle a good portion of the gumbo around the rice. Sprinkle with chopped parsley.

Duck and Andouille Sausage Gumbo

Posted in Accompaniments, Ahh Haa Moments, Andouille Sausage, Duck, Food For Thought, Gumbo, Ham, Ham Stock, Rice, Tasso Ham | Tagged , | Comments Off on Duck and Andouille Sausage Gumbo

Super Bowl 50 Party Treats

The long awaited, end of the season, BEST party of the year is almost here. I’m giving you some ideas for Super Bowl 50 Party Treats that will please the crowd and make you the hit of the Super Bowl Party.

I catered a Super Bowl Party every year from 2003 to 2011 for a couple who threw the BEST Super Bowl Parties ever. We would start with passed hors d’oeuvres for the first quarter of the game and serve dinner at the beginning of the second quarter. This way everyone could get their set and be settled to watch the half time show.  

The Hors d’oeuvres were a variety of usually 6 or 7 different finger foods (some of which are in this post). And dinner was Grilled New York Strip Steaks, Grilled Fish, Twice Baked Potatoes, Lobster Mac and Cheese, Salad, Vegetables and so much more. Dessert was most always assorted cookies, brownies and cupcakes. I miss that party as it was my absolute favorite party of the year. Thank you Don and Sheri for creating so many great food memories. I really do miss cooking for your Super Bowl Party.

Click on to the title of the recipe or picture to get to the recipe.

Buffalo Style Chicken Wings with Blue Cheese Dressing

Buffalo Style Chicken Wings


Wild Mushroom and Brie Quesadillas

quesadilla-with-fresh-salsa

Corn Fritters

Conch Fritters

BBQ Pork Ribs

BBQ Ribs


Pulled Pork Soft Tacos

Happy Super Bowl 50

camille@camillecooksforyou.com

Posted in Accompaniments, Ahh Haa Moments, Ancho Chili Preserves, Appetizers, BBQ Ribs, BBQ Sauce, Blue Cheese, Brie, Brine, Cheese, Chicken, Food For Thought, Fritters, Mushrooms, Onion Jam, Pork, Poultry, Pulled Pork, Quesadilla, Recipes To Share, Salsa, Vinaigrettes and Dressings | Tagged , , , , , , , , , , , | Comments Off on Super Bowl 50 Party Treats

Chicken Salad Italian Style Alla Lisa

I recently posted Chicken Salad Italian Style to my site and was overwhelmed with the ton of positive reviews I received. My cousin Lisa made the salad and put her own twist on it by using White Balsamic Vinegar instead of the dark I used in my original recipe. I love that Lisa did this: Her Chicken Salad Italian Style not only looks delicious but beautiful as well. I truly I hope you will try either one of the versions of this lovely, light and healthy Chicken Salad.

Lisa’s Chicken Salad Italian Style

Chicken Salad Italian Style Alla LisaMy Chicken Salad Italian Style

Chicken Salad Italian Style

Thank you all for the compliments on the salad and thank you Lisa for using my recipe with great success and for sending the photo.

I love it when you shake it up a bit with a recipe, mine or anyone else’s. It is what cooking is all about. If we didn’t make changes to recipes there would never be any new dishes to try. On Facebook I recently saw a recipe by a chef I worked for a very long time ago. This was a recipe we did at his restaurant over 25 years ago, it’s in his cookbooks and now he is reintroducing it to us at a new restaurant he is opening in Central Florida. The recipe is the same but he changed it up ever so slightly to make it new all over again. I love that he did this and it is reassuring to me, and all good chefs, that there will never be a time when new recipes do not come about.

(In my original Chicken Salad Italian Style I’ve made a note of choosing either vinegar.)

Enjoy!!

camille@camillecooksforyou.com

Posted in Accompaniments, Ahh Haa Moments, Chicken Salad, Vinegar | Tagged , | Comments Off on Chicken Salad Italian Style Alla Lisa

Recipe Repair

If you are like me you probably have a recipe box containing old recipes handed down from your Mother, Grandmothers and Aunts that bring back memories of days gone by when you were a child enjoying all of the delicious dishes they made. But now you have this box of recipes that are incredibly vague and you don’t know where to start. I can help you create new memories with these recipes by deciphering and organizing what was written so you can make old memories become new again.

I have added a new page to my site, RECIPE REPAIR. All you have to do is send me the recipe and I will rewrite it with exact measurements and ingredients that Mom, Grandma and Auntie used. I did this with many of my Mom’s recipes with great success.

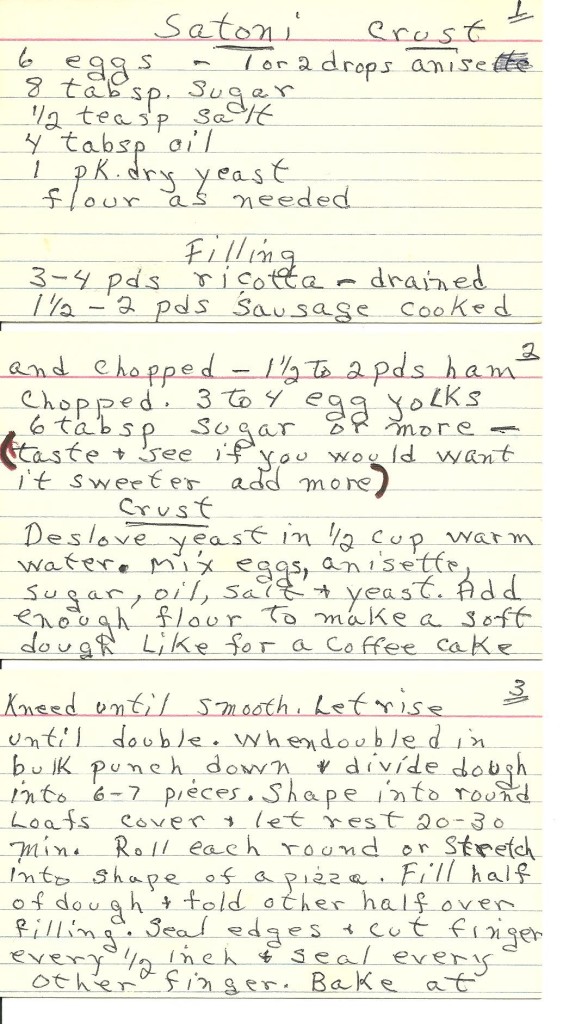
Here is one example: This is my Mother’s recipe for SATONI which is CALZONE or EASTER PIZZA. This was my Grandmother Lucia’s recipe that my Mother interpreted. Notice the amount of flour, “Add enough flour to make a soft dough. Like for a coffee cake.” WHAT? And how about “Bake at”? No oven temperature to go by.

Calzone Recipe - 1


What I did was make the recipe several times until I got it just right. Here is my updated version of my Mother’s version of her Mother’s Satori recipe:

Grandma Lucia’s Satoni

Satoni Ready For The Oven

Makes 6 Satoni

For the Dough

1        Package Active Dry Yeast (1/4 Ounce, Not Instant)

6        Large Eggs

8        Tablespoons Granulated Sugar

4        Tablespoons Vegetable Oil

2        Drops Pure Anise Oil

1        Teaspoon Fine Sea Salt

6-7     Cups All-Purpose Unbleached Flour

For the Filling

4        Lbs. Whole Milk Ricotta, Drained

1.5     Pounds Italian Sausage, Cooked and Cut into Small Dice

1.5     Pounds Ham Steak, Cut into Small Dice

4        Large Egg Yolks

6        Tablespoons Granulated Sugar

1        Teaspoon Fine Sea Salt

½       Teaspoon Freshly Ground Black Pepper

For the Glaze

2        Large Eggs

1        Tablespoon Water

1        Cup Pastel Candy Jimmies

Make the Dough

In the bowl of a standing mixer fitted with the dough hook, dissolve the yeast in ½ cup warm water (110 Degrees F).  Set aside until yeast begins to foam, about 5 minutes.  Lightly beat the eggs with a fork.  Add the sugar, vegetable oil, anise oil and salt to the eggs and add this to the yeast.  With the mixer on low, gradually add the flour one cup at a time.  Add enough flour to make a soft dough.  You may not need all seven cups.  With the mixer still on low, knead the dough until smooth and soft.  Transfer dough to a large bowl that has been lightly oiled with a small amount of vegetable oil, cover with a tea towel and let rise in a warm, draft free place until double in volume, about 1½ to 2 hours.  Punch down the dough, divide into 6 equal pieces.  Shape the pieces into balls.  Set aside on two trays lined with plastic wrap and let rest for 30 minutes.

Make the Filling

While the dough is rising, make the filling.  In a large bowl, mix all of the filling ingredients together until well combined.  Set a side at room temperature.

Forming and Baking the Satoni

Preheat oven to 350ºF with the rack in the middle of the oven.

On a lightly floured board, roll each piece of dough into a 10” to 12” Round.

Divide the filling between the six rounds, placing the filling on one side of the round.  Leave at least a two inch boarder.  Mix the 2 eggs with the water and brush a little of the egg wash on the boarder.  Fold the dough over the filling and decoratively crimp the edges being sure to completely seal the filling.  Brush the top of each of the Satonis with a little egg wash.  Poke three small holes on top of the Satoni with a thin bladed knife.  This helps the steam escape and will prevent cracking.  Transfer the Satonis to 3 half sheet pans (13″x18″) lined with parchment paper, 2 Satonis per half sheet pan.  Bake each pan separately until golden brown, about 25-35 minutes.  Rotate the pan half way through the cooking time.  (You can either roll out and fill two at a time and while one pan is baking you can roll out the next two.)

Cool on a wire rack.  Once completely cooled, very lightly brush some of the egg wash onto each Satoni and sprinkle with the pastel jimmies.  Be sure the Satonis are completely cooled through and through before sprinkling with the jimmies.

Store the Satonis overnight at room temperature.

~~~~~~~~~~~~~~~~~~~~~~~~~~~

The point is, I can help you bring back those delicious recipes in a way you will be able to understand. Once done you can pass these recipes on to your family so they can make them for their families. Doing this will help keep traditions alive. I will also help you with any recipe that you are having trouble with or doesn’t work for you. I can even help you locate items in the recipes that you can’t find.

All you have to do is email me with a copy of the recipe. I will get it back to you rewritten in a way you will understand. I will do it privately if you wish or on this site. You decide:  You may not want to share your family’s recipes with the whole world and I will respect your wishes. Send pictures if you have any and I will send my pictures back to you.

This sounds like a lot of fun so join in and let’s get started restoring, rewriting, recapturing your delicious memories.

camille@camillecooksforyou.com

Posted in Food For Thought, Recipes To Share | Comments Off on Recipe Repair

Triple Chocolate Brownies

Triple Chocolate Brownies

Finally, my Triple Chocolate Brownie Recipe. Many of you have been asking for it but I didn’t have any photos of these brownies from heaven to post. I finally got around to making the brownies specifically to take photos.

Here’s another recipe that I’ve made hundreds of times in my years as a caterer. This was always a featured item on a cookie or dessert buffet and usually the first to disappear. There are several variations of these chewy, delicious brownies: Cream Cheese Swirl Brownies, Turtle Brownies, Peanut Butter Brownies, Raspberry Brownies –  the list goes on and on but since I don’t have any photos of them I’ll wait to post the variations as I make the different brownies.

This Brownie recipe is truly a Chocolate Lover’s Delight. Plus it is easy, has few steps, can be made ahead and is a real crowd pleaser. The recipe makes a lot of brownies. You can cut them into large brownies getting about 18 to 24 or bite size brownies in which you can get up to 60 pieces. It all depends on what size you like.  They also freeze really well as long as they are double wrapped in plastic wrap and them placed in a freezer plastic bag. They can last up to a month in the freezer.

Makes 2 Dozen Large Brownies or As Many As 60 Bite-Size Brownies

1          Pound Unsalted Butter

1          Pound Hershey’s Special Dark Chocolate Chips

6          Ounces Unsweetened Chocolate, Coarsely Chopped (I put the Chocolate in a plastic bag and pound it with a mallet to break it up)

8          Large Eggs

3          Tablespoons Instant Espresso Powder

2          Cups Granulated Sugar

2          Tablespoons Pure Vanilla Extract

1½      Cups All-Purpose Flour

1          Tablespoon Baking Powder

1          Teaspoon Fine Sea Salt

1          12 Ounce Bag White Chocolate Chips

1          12 Ounce Bag Hershey’s Special Dark Chocolate Chips

1          12 Ounce Bag Mini Chocolate Chips

Preheat oven to 350°F with rack in the middle of the oven.

Line a 13”x18” half sheet pan with heavy duty aluminum foil bringing the foil up the sides about 1 inch all the way around the pan. Spray the pan with non-stick baking spray such as Pam. Be sure to use wide foil to avoid any seams.

Place the butter, 1 pound of chocolate chips and unsweetened chocolate in a large bowl and melt over a double boiler of simmering water. Stir often to blend together. Remove the bowl from the double boiler and set aside to cool to room temperature.

In a large bowl, lightly beat the eggs and sprinkle the espresso powder over them. Let rest for 5 minutes to soften the espresso powder. After 5 minutes add the sugar and vanilla and blend well with wire whisk. Stir in the cooled chocolate mixture and blend well.

Stir together the flour, baking powder and the salt. Sprinkle over the cooled chocolate mixture and fold in with a rubber spatula making sure there are no white streaks running through the batter. Add the white chocolate and dark chocolate chips to the batter and blend until evenly distributed. Pour into the prepared pan, smooth out with an off-set spatula and sprinkle the mini chips evenly over the top of the batter.

Bake the brownies for 35-40 minutes turning the pan half way through the baking time. The brownies are done when there is a slight wiggle in the middle of the pan. Don’t over cook them as they will continue to cook while cooling down.

Cool the brownies on a wire rack and when completely cool transfer to the refrigerate for at least three hours. After refrigerator chilled, remove the pan from the refrigerator and invert onto a cutting board. Remove the foil (it will peel back easily) and re-invert the brownies so that the mini chips are facing up (Be careful here, you don’t want it to break apart.  The longer in the refrigerator the less likely that will happen). Cut into desired size squares.

camille@camillecooksforyou.com

Posted in Ahh Haa Moments, Brownies, Chocolate, Dessert, Desserts, Hershey's Special Dark Chocolate, Mini Chocolate Chips, Unsweetened Chocolate, White Chocolate | Tagged | Comments Off on Triple Chocolate Brownies

Soup – Homemade, Hot, Comforting, Nostalgic

BRRR! It is cold outside. Here are some soups to warm the tummy and the soul.  Each soup can be made days in advance and reheated when ready to serve. I have the recipe for the Chilled Sweet Pea Vichyssoise here, but you can serve it hot as well. The Gazpacho is a chilled soup, but the chili spices can make you warm on the inside. Each Soup is hearty and can be served with a side salad or just a hunk of artisan bread.

Click on to the name of the soup or the picture and you will go directly to that recipe. If you have any questions email me or ask in the comment section.

camille@camillecooksforyou.com

Austrian Vegetable Soup

Austrian Vegetable Soup


Corn & Chicken Chowder

Corn and Chicken Chowder

Gazpacho

Gazpacho

Golden Split Pea Soup

Golden Split Pea Soup

Pasta Fagioli

Pasta Fagioli Topped with Parmesan Cheese

Pasta Fagioli Topped with Parmesan Cheese

Sweet Pea Vichyssoise

Chilled Sweet Pea Vichysoisse

Tortilla Soup

Tortilla Soup

Wild Mushroom & Chestnut Soup w/Chicken

Wild Mushroom and Chestnut Soup

Wild Rice & Chicken Soup w/Mushrooms

Wild Rice And Chicken Soup with Mushrooms

Posted in Accompaniments, Ahh Haa Moments, Food For Thought, Soup | Tagged , , , , , , , , | Comments Off on Soup – Homemade, Hot, Comforting, Nostalgic

Chicken Salad Italian Style


Chicken Salad Italian Style

Try this chicken salad for a change of pace to take a break from the mayonnaise dressed chicken salad. Not that there is anything wrong with mayo but this salad is lighter and full of layers of flavor.

Chicken Salad Italian Style was a big seller at my store “Camille’s Gourmet To Go and Catering”. It outsold any chicken salad made with mayonnaise and became the hands down favorite of all the salads. I haven’t made it for some time and when I recently served it at a luncheon the reviews became raves. I served the salad on a bed of Baby Arugula lightly dressed with a vinaigrette made of XVOO, Balsamic Vinegar and Honey. Also on the plate were Roasted Beets, Roasted Asparagus, Kalamata Olives and Gorgonzola Cheese.  Enjoy!!!

Serves 6 As An Entrée

To Roast Chicken

2          Whole Bone-In Chicken Breasts with Skin On, Split in Half (You should have about 5 cups cooked chicken after taking off the bone)

3          Tablespoons XVOO

1          Teaspoon Coarse Sea Salt

½         Teaspoon Freshly Ground Black Pepper

To Make Salad

5           Cups Roasted Chicken Breast

½         Cup Dried Tomatoes, Re-Hydrated

½         Roasted Red Peppers

1          Cup Thinly Sliced Celery, Sliced Diagonally

4          Scallions, Thinly Sliced Diagonally

2          Tablespoons Chopped Fresh Basil

2          Teaspoons Chopped Fresh Thyme

2          Tablespoons Chopped Fresh Italian Parsley

2          Roasted Garlic Cloves, Smashed

1          Teaspoon Coarse Sea Salt

½         Teaspoon Freshly Ground Black Pepper

Pinch Red Pepper Flakes

½         XVOO

¼         Cup Balsamic Vinegar (or WHITE Balsamic Vinegar)

Preheat Oven to 375°.

Place the split chicken breasts (you will have 4 pieces) skin side up on a baking sheet, drizzle with XVOO and sprinkle with 1 teaspoon coarse sea salt and ½ teaspoon freshly ground black pepper. Roast in the oven for approximately 40 minutes, or until done when tested with a meat thermometer at 165°F. Remove from oven and let cool until the chicken is easy to handle. Remove the skin and bones from the chicken. Cut the chicken into chunks or pull into pieces and transfer to a large bowl. (You should have about 5 cups cooked chicken after taking off the bone.)

Add the rest of the ingredients and toss to combine. Serve immediately at room temperature or refrigerate until ready to serve. Remove from the refrigerator 30 minutes before serving.

Posted in Accompaniments, Ahh Haa Moments, Chicken, Food For Thought, Poultry, Roasted Peppers, Salad, Sun Dried Tomatoes | Tagged , , , | Comments Off on Chicken Salad Italian Style

Crescent Cookies

Crescent Cookies

Makes About 5 Dozen

4       Cups All-Purpose Flour

1½     Cups Finely Chopped Pecans

½       Teaspoon Fine Sea Salt

2       Cups (1 Pound) Unsalted Butter, Room Temperature

¾       Cup Granulated Sugar

1       Tablespoon Pure Vanilla Extract

4       Teaspoons Heavy Cream

2       Cups Confectioners Sugar (10X)

Preheat oven to 350°F. with rack placed in the middle of the oven. Line 2 cookie sheets with parchment paper.

In a medium bowl whisk the flour, pecans and salt together. Set aside.

In the bowl of a standing mixer fitted with the paddle attachment, cream the butter and sugar together on medium-high speed until light and fluffy, about 4 minutes. Beat in the vanilla and heavy cream. Set the mixer speed to low and slowly add the flour/pecan mixture. Set the speed to medium and beat until well blended and dough comes together, about 30 seconds.

Using a small ice cream scoop (Tablespoon Size) measure out the dough onto the baking sheets. Roll each ball into a crescent shape, spacing each cookie about an inch or so apart. You should be able to fit 7 rows of 3 on a standard size half-sheet pan.

Bake one sheet pan at a time for 12 to 15 minutes, rotating the pan half way through the cooking time. Bake until slightly golden on the edges and bottoms. Remove from oven and cool for 10 minutes. Keep your eyes on the cookies, as every oven is different. You may have to adjust your cooking time.

Place the confectioners sugar on a flat plate and, VERY CAREFULLY, dredge the warm cookies into the powdered sugar to coat. Do this carefully as the cookies are quite fragile. It is best to coat them while still warm so the confectioners sugar melts into the cookie. Place on a cooling rack. Once completely cooled, store in a airtight cookie tin for several days.

Dust with more powdered sugar before serving.

Hints and Tips: Finely chopping the pecans in a food processor is your best bet.

Posted in Ahh Haa Moments, Butter, Cookies, Crescent Cookies, Food For Thought, Pecans, Sugar | Comments Off on Crescent Cookies

Decorated Christmas Sugar Cookies

Decorated Christmas Cookies

This coming week is the week I will be making Decorated Christmas Sugar Cookies. This is a project (an event, really) that takes several days as I make a lot of these beautiful and delicious cookies. I like to give them as gifts, attach them to Christmas gifts and send to work with Jim for his holiday party. The cookies store well and will keep for several weeks in a cookie tin although they are eaten well before Christmas Day.

Decorated Christmas Sugar Cookies

2          Large Egg Yolks

3          Tablespoons Heavy Cream

3½      Cups All Purpose Flour

1          Cup Granulated Sugar

2½     Sticks (10 Oz.) Cold Unsalted Butter, Cut Into 1 inch pieces

Royal Icing for Decorating

Preheat oven to 350°.

In a small bowl, whisk the egg yolks with the cream. In a standing electric mixer fitted with the paddle attachment, combine the flour and sugar. Add the butter and beat at low speed until the mixture resembles crumbs, 2 to 3 minutes. Add the cream-egg mixture in a slow steady stream, beating at low speed until the ingredients are just combines. Divide the dough into 2 equal pieces, shape into disks, wrap in plastic and refrigerate at least 2 hours or overnight. Let the dough stand at room temperature for 30 minutes before rolling.

Line several baking sheets with parchment paper. On a lightly floured surface, roll out the dough ¼ inch thick (thick is important) and cut out shapes. Place on the parchment lined baking sheets and bake for 16 to 18 minutes, or until pale golden. Cool on the trays.

When cookies are completely cooled, frost them with Royal Icing. Let cookies sit overnight uncovered. This gives the icing time to set. Cookies can be stored in tins for a long time, 3 to 4 weeks.

DSC_0030 DSC_0040

Posted in Ahh Haa Moments, Christmas Cookies, Cookies, Decorated Sugar Cookies, Food For Thought, Holiday Cookies, Royal Icing | Comments Off on Decorated Christmas Sugar Cookies

Appetizers and Hors d’oeuvres

The holidays are upon us and that means  a lot of parties and entertaining. Here are a few Hors d’Oeuvres that are perfect party food. Much of the work can be done in advance so you won’t be spending a ton of time in the kitchen while your guests are enjoying the party.

Click on to the title of the item and it will bring you to the recipe page. Enjoy!!!

Crab Cakes

Crab Cakes


Conch Fritters

Conch Fritters

Salmon Gravlox

The Gravlox can be made plain or, my favorite way Pastrami style, coated with butchers grind black pepper. It’s totally up to you.

Salmon Gravlox

Goat Cheese Crisp

Goat Cheese Crisp with Tomato-Cucumber-Mint "Salsa"

Goat Cheese Crisp with Tomato-Cucumber-Mint “Salsa”

camille@camillecooksforyou.com

Posted in Accompaniments, Ahh Haa Moments, Ancho Chili Preserves, Appetizers, Cocktail Sauce, Conch, Conch Fritters, Condiments, Dill Creme Fraiche, Food For Thought, Gravlox, Hints and Tips, Hors d'oeuvres, Maryland Crab Cakes, Maryland Lump Crab Meat, Preserves, Recipes To Share, Remolaude Sauce, Salmon, Sauces, Side Dishes | Tagged , , , , , , , | Comments Off on Appetizers and Hors d’oeuvres